搜尋此網誌

2014年12月9日 星期二

How to Use Sections in Word 2013

How to Use Sections in Word 2013

Page formatting commands in Word 2013 usually affect every page in a document.  However, sometimes you need a document that isn't formatted the same way for every page. For example, you may want to change page number formats (i, ii, iii, vi, 1, 2, 3, ...), or have the first page of a document be an unnumbered cover page. These tricks are possible with sections.

Create a Section
  1. Position the toothpick cursor where you want the new section to start.
  2. Click the Page Layout tab on the Ribbon.
  3. Click the Break button.  There are 7 items.  Choose "Next Page" in the "Section Breaks" group.
  4. Similar to page breaks, this starts a new section.
Change the Numbering Style of a Section
  1. If you don't have a Page Number yet, insert one.
  2. Then in the Design tab,  click the "Page Number" button and choose "Format Page Numbers".
  3. Change the "Number Format" to be "i, ii, iii, ...".
  4. If necessary, specify the "Start at" value.
Change the Orientation of a Section
  1. In the Page Layout tab, click the "Orientation" button.
Delete a Section Break
  1. A section break is just like a character in your document, so it should be easy to delete with a Delete key.
  2. When you have trouble finding the section breaks, switch to Draft view.

2014年12月7日 星期日

How to disable AUTORUN in Windows 7

http://answers.microsoft.com/en-us/windows/forum/windows_7-security/how-do-i-disable-autorun-windows-7/7ba51974-c009-44ad-9067-f3968744175b

  1. Run "gpedit.msc"
  2. Expand "Administrative Template" under "User Configuration"
  3. In "Windows Components" - "AutoPlay Policies", double-click "Turn off Autoplay".
  4. Click "Enable" and select the option "CD-ROM and removable media drives" (or "All drives", if you prefer).
  5. Click "OK".

2014年10月16日 星期四

How to export Facebook events to Google Calendar

https://www.facebook.com/help/152652248136178

  1. Click "Events" on the left.
  2. At the bottom right, right-click "Upcoming Events", and choose "Copy Link Location".
  3. In Google Calendar, click the down-arrow next to "Other calendars" and choose "Add by URL".
  4. Paste the URL which you copied in Step 2.  Press Enter.
  5. Wait for a few seconds and you'll see your Facebook events are automatically synchronized to your Google Calendar.

2014年6月23日 星期一

Disable the close multiple tabs warning in Firefox

https://support.mozilla.org/en-US/questions/971930

In Tools - Options -Tabs, I have already disabled "Warn me when closing multiple tabs".  However, this only affects the action when you click the red cross button at the right-top corner. 

If you want to disable the warning when you right-click a tab and choose "Close Tabs to the Right" or "Close Other Tabs", do the following:
  1. In the Location bar, type "about:config" and press Enter.
  2. In the Search field box at the top, type browser.tabs.warnOnCloseOtherTabs.
  3. Double-click the browser.tabs.warnOnCloseOtherTabs preference to set its value to false.

2013年5月10日 星期五

How to set Notepad default format to Word Wrap

http://www.techtin.com/windows-7/how-to-set-notepad-default-format-to-word-wrap/
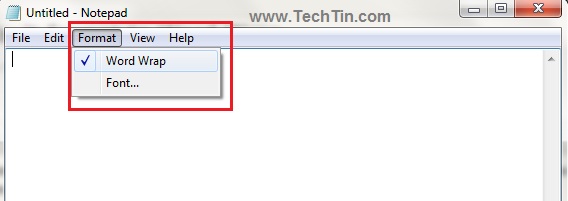
  1. You can enable / disable word wrap from Format >> Word Wrap
    http://www.techtin.com/wp-content/uploads/2011/05/53.jpg
  2. If you want to enable word wrap by default, modify windows registry:
    1. regedit
    2. Navigate to HKEY_CURRENT_USER\Software\Microsoft\Notepad,
      • Add a key "fWrap" (Double Word) with value 1.
    3. Close the registry manager.


2013年4月9日 星期二

Connect WinXP to Win7 via Remote Desktop

  • http://blogs.yyes.chc.edu.tw/post/2/3607
  • When trying to connect to win7-cc, WinXP shows an error message "遠端電腦需要網路層級驗證".
  • 在 mstsc 點左上角,選「關於」,可看到「不支援網路層級驗證」 (Network Level Authentication, NLA)
  • regedit
    1. 找到「HKEY_LOCAL_MACHINE\SYSTEM\CurrentControlSet\Control\Lsa」的「Security Packages」加入「tspkg」
    2. 將「HKEY_LOCAL_MACHINE\SYSTEM\CurrentControlSet\Control\SecurityProviders」的「SecurityProviders」數值資料最後再加入「,credssp.dll」
  • Now mstsc can connect to Windows 7, but authentication still fails.
  • Download Remote Desktop 7.0 http://www.microsoft.com/zh-tw/download/details.aspx?id=20609
  • 發生驗證錯誤。要求的安全性封裝不存在。
  • Restart WinXP. Now you can login successfully. (So maby you don't need to install KB969084.)

2012年11月7日 星期三

IPv6 support in VNC Viewer E4.1.7/P4.1.2


VNC Viewer E4.1.7 & P4.1.2 are fully IPv6-aware, and can connect to hosts specified by IPv4 address, IPv6 address or by DNS name. In the case of DNS names, VNC Viewer will attempt to connect to each address associated with the host name in turn until a connection succeeds. If a host has both IPv4 and IPv6 addresses registered with DNS then VNC Viewer will usually attempt to connect first using IPv6, and fall back to IPv4 only if that fails.

VNC Viewer uses the colon (":") as the delimiter between hostname and port number, which clashes with IPv6 addresses' use of the same character as a separator. VNC Viewer therefore allows hostnames and addresses to be escaped by enclosing them within square braces ("[" and "]"), preventing colon separators from being mis-interpreted as port number delimiters.

Handling of IPv6 addresses is dealt with by the host operating system. Compliance with the IPv6 specification is therefore dependent upon the support provided by the host operating system. In particular, functionality such as embedded IPv4 addressing (.e.g addresses such as ::ffff:192.168.0.1) is not supported on some systems.

VNC Server E4.1.7 & P4.1.2 are fully IPv6-aware, but is shipped with IPv6 support disabled by default, for security reasons. IPv6 can be enabled by setting "InTransports=IPv6,IPv4" (the default being IPv4 only), either on the command-line when starting vncserver under Unix, or in the registry on Windows systems.